The Best Fluffy Pancakes recipe you will fall in love with. Full of tips and tricks to help you make the best pancakes.
Ever wondered what desserts graced the tables of 18th-century royalty? Meet the Queens Cake—a delicate, buttery treat flavored with rosewater, citrus, and warm spices that once delighted aristocrats and commoners alike. Today, this 18th century queens cake recipe isn’t just a relic of the past; it’s a charming project for home bakers craving a taste of history. Imagine pulling golden, fragrant cakes from your oven, their aroma echoing centuries of tradition.
Whether you’re a history buff, a baking enthusiast, or simply searching for the best queen cakes recipe to impress guests, this revived classic offers simplicity with a dash of old-world elegance. Ready to bake like it’s 1747? Let’s bring these 18th century queens cake recipe style into your modern kitchen—no powdered wigs required!
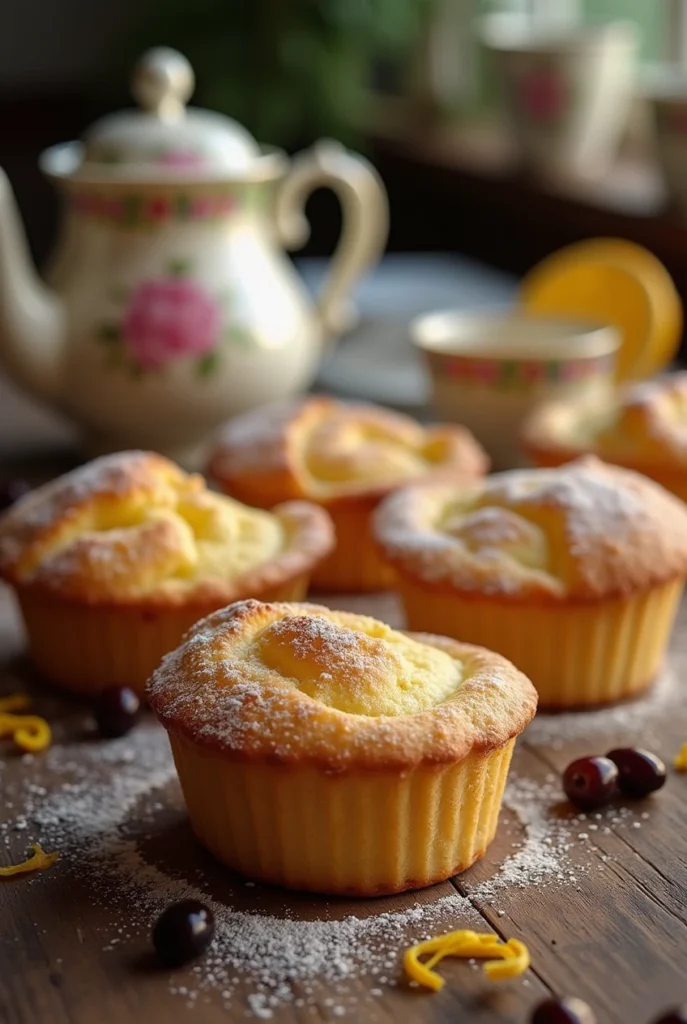
Table of Contents
- Don’t Miss This Recipe: Recipe Squash And Kidney Beans
What Makes the 18th Century Queens Cake recipe Special?
Picture this: a bite-sized cake so beloved in the 1700s that it earned a royal name. The 18th century Queens Cake recipe isn’t just a dessert—it’s a time capsule of flavors, techniques, and stories. Here’s why this historic treat deserves a spot in your modern kitchen:
1. A Slice of Culinary History
- Royal Roots: Named for its popularity in aristocratic circles, these cakes were a staple at lavish tea parties (queen cakes 1800s style!). Think of them as the “cupcakes” of their era, but with far more elegance.
- Old-World Ingredients: Recipes from the 1700s relied on rosewater, nutmeg, and citrus zest—exotic luxuries back then. Today, they add a nostalgic, fragrant twist you won’t find in modern desserts.
2. Unique Flavors That Still Shine
Forget bland sponge cakes! The best queen cakes recipe balances:
- Warm spices: Nutmeg and mace (a subtle cousin of nutmeg) add cozy depth.
- Bright citrus: Lemon or orange zest cuts through the richness.
- Floral hints: Rosewater (or vanilla) gives a delicate aroma that’s surprisingly modern.
3. Simplicity Meets Sophistication
Unlike fussy pastries, this queen cake recipe is beginner-friendly:
- No fancy tools: 18th-century bakers used wooden spoons and elbow grease—no stand mixers needed!
- Versatile: Serve them plain for authenticity, or add currants for texture. They’re perfect with tea, dessert wine, or a dollop of clotted cream.
4. Why Bake Them Today?
- Conversation starter: Impress guests with a treat that’s equal parts delicious and historically intriguing.
- Timeless appeal: The soft, buttery crumb and aromatic flavors work for brunch, afternoon tea, or even a unique holiday dessert.
Ready to bake like it’s 1747? Let’s dive into the 18th century queens cake recipe—where history meets your taste buds!
- READ ALSO: Classic Pineapple Casserole Recipe
Ingredients for an Authentic 18th century queens cake recipe
Let’s gather ingredients that would make an 18th-century baker proud! This 18th century queens cake recipe balances historical authenticity with modern pantry staples. Whether you’re a purist or prefer subtle tweaks, here’s everything you’ll need to recreate these best queen cakes recipe-worthy treats:
Classic 18th-Century Ingredients
(For a traditional “queen cakes 1800s” flavor)
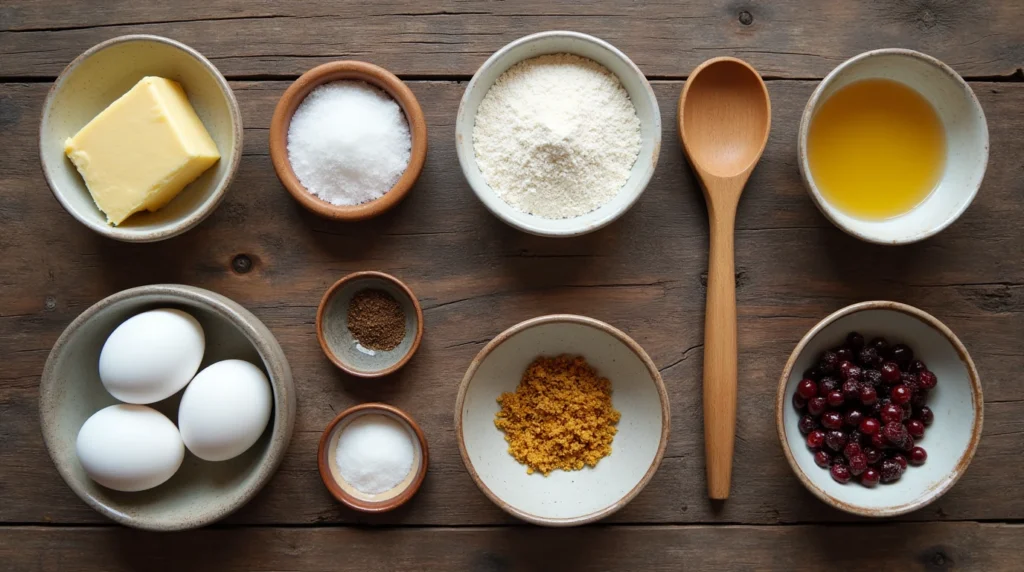
- 1 cup (225g) unsalted butter, softened – The foundation of the cake’s rich, tender crumb. (Fun fact: 18th-century recipes often measured butter by the pound!)
- 1 cup (200g) granulated sugar – A luxury in the 1700s, now a pantry staple.
- 4 large eggs – For structure and moisture. (Tip: Let them sit at room temperature for smoother mixing!)
- 2 cups (250g) all-purpose flour – Use unbleached for a rustic texture.
- ¼ tsp ground nutmeg – The signature spice of historic baking.
- ¼ tsp ground mace – Adds a warm, subtle complexity (substitute with nutmeg if unavailable).
- 1 tsp rosewater – The floral essence of old-world desserts (swap with vanilla extract for a modern twist).
- Zest of 1 lemon or orange – Brightens the rich batter.
- ½ cup (75g) dried currants – Tiny, tart, and traditional (raisins work too!).
Modern Ingredient Swaps
(For flexibility without losing charm)
- No rosewater? Use 1 tsp vanilla extract or orange blossom water.
- No currants? Try dried cranberries or chopped apricots.
- Gluten-free? Swap flour with a 1:1 gluten-free blend.
Pro Tips for Success
- Butter matters: Soften it slightly—not melted—to mimic the texture of hand-creased 18th-century butter.
- Fresh spices: Nutmeg and mace lose potency fast. Grind whole spices yourself for maximum aroma.
- Citrus hack: Use a microplane to zest citrus finely—no bitter pith allowed!
With these ingredients, you’re ready to bake a batch of 18th century queens cake recipe delights that taste like history (but way better!). Let’s move to the method!
- See Also: Taco Dip Recipe
Step-by-Step 18th Century Queens Cake Recipe

Ready to bake like a 1700s pastry chef? This 18th century queens cake recipe is surprisingly simple, but packed with timeless charm. Follow these easy steps to create buttery, fragrant cakes that’ll transport your taste buds to a Georgian-era tea party!
1. Prep Like It’s 1747
(Tools & Setup)
- Preheat your oven to 350°F (175°C).
- Grease a muffin tin or line it with parchment cups (for easy removal).
- Pro tip: Use small ramekins or dariole molds for a queen cakes 1800s aesthetic!
2. Cream Butter & Sugar (The Old-School Way)
(No electric mixer? No problem!)
- In a large bowl, cream 1 cup softened butter and 1 cup sugar by hand for 3–4 minutes. Aim for a pale, fluffy texture. (Tip: Soften butter by leaving it on the counter for 30 minutes—don’t microwave!)
- Beat in 4 eggs, one at a time, mixing fully after each addition.
3. Blend Dry Ingredients & Spices
(Hello, historic flavors!)
- In a separate bowl, whisk together:
- 2 cups flour
- ¼ tsp nutmeg
- ¼ tsp mace (or extra nutmeg)
- Gradually fold the dry mix into the butter-sugar blend. Stir just until combined—overmixing = tough cakes!
4. Add Signature 18th-Century Flavors
- Mix in:
- 1 tsp rosewater (or vanilla extract)
- Zest of 1 lemon or orange
- Gently fold in ½ cup currants (if using).
5. Bake to Golden Perfection
- Spoon batter into molds, filling ⅔ full.
- Bake 15–20 minutes, until the edges are golden and a toothpick inserted in the center comes out clean. (Watch closely—small cakes bake fast!)
- Cool in the pan for 5 minutes, then transfer to a wire rack.
6. Serve with a Dash of History
- Traditional pairing: Serve slightly warm with black tea or sherry.
- Modern twist: Dust with powdered sugar or drizzle with honey.
Pro Tips for the Best Queen Cakes Recipe:
- No sinking currants? Toss them in flour before folding into the batter.
- Crispy edges? Bake in a preheated cast-iron mold for a caramelized crust.
- Make ahead: These cakes stay fresh in an airtight container for 3 days!
There you have it—a queen cake recipe that’s survived centuries for good reason.
- You May Also Like: Ground Chicken Mexican Corn Recipe
Serving Suggestions & Modern Twists
Your 18th century queens cake recipe is baked to perfection—now let’s make it shine! Whether you’re hosting a themed tea party or craving a cozy treat, here’s how to serve these historic gems with flair (and a few clever upgrades):
1. Traditional Pairings (Hello, 1700s!)
- Tea Time Classic: Serve warm Queen’s Cakes with Earl Grey or Darjeeling tea—just like 18th-century aristocrats.
- Sweet & Spirited: Pair with a small glass of sherry or dessert wine for an authentic queen cakes 1800s experience.
- Clotted Cream & Jam: Add a dollop of cream and strawberry preserves for a British-inspired twist.
2. Modern Twists for Today’s Palate
Transform your best queen cakes recipe into something fresh:
- Citrus Glaze: Whisk powdered sugar with lemon juice and drizzle over cooled cakes.
- Toasted Almonds: Press slivered almonds into the batter before baking for crunch.
- Spiced Honey Butter: Serve with a side of honey butter infused with cinnamon or cardamom.
3. Creative Flavor Variations
- Lavender-Lemon: Swap rosewater for culinary lavender and double the lemon zest.
- Chocolate-Currant: Add 2 tbsp cocoa powder to the dry ingredients and use dark chocolate chips instead of currants.
- Vegan Adaptation: Substitute butter with coconut oil and use flax eggs (1 tbsp ground flax + 3 tbsp water per egg).
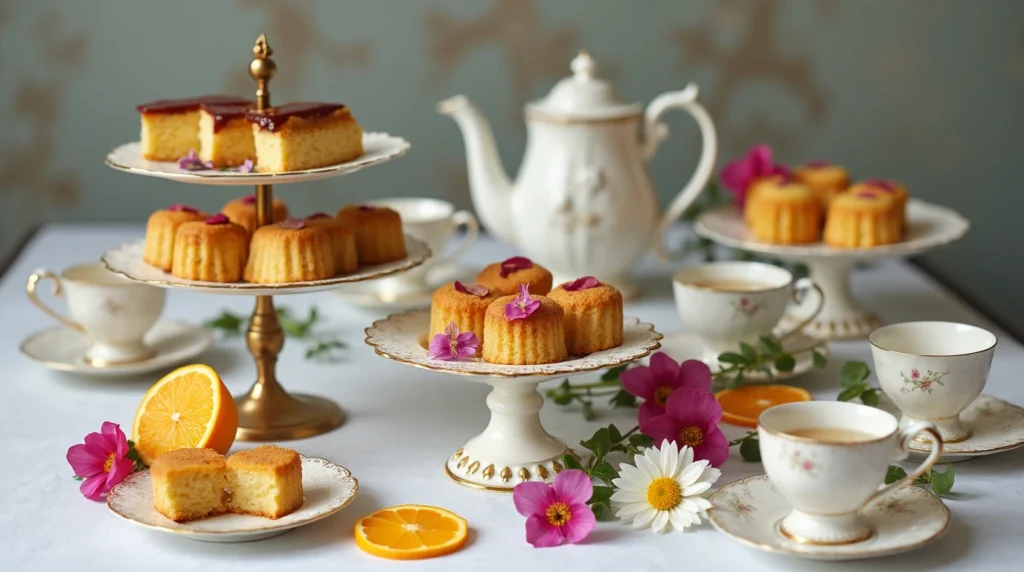
4. Occasion-Worthy Presentation
- Vintage Vibes: Arrange cakes on a tiered stand with edible flowers (like violets or pansies) for a historic tablescape.
- Gift Idea: Wrap cooled cakes in parchment paper tied with twine—perfect for foodie friends or hostess gifts.
- Brunch Star: Crumble over yogurt or serve with fresh berries for a decadent breakfast.
Pro Tip: Make-Ahead Magic
Queen’s Cakes taste even better the next day! Store them in an airtight container for up to 3 days, or freeze for 1 month. Refresh in a 300°F oven for 5 minutes before serving.
Whether you stick to tradition or experiment with bold flavors, this 18th century queens cake recipe is your canvas.
- Further Reading: Easy Baked Rockfish Recipe
Common Questions About Queen’s Cakes
Got questions about this 18th century queens cake recipe? I’ve got answers! Here’s a bite-sized FAQ to help you bake with confidence and curiosity:
Why are they called “Queen’s Cakes”?
Royal roots: These petite cakes were a favorite in 18th-century aristocratic circles, often served at tea parties hosted by or for nobility. The name likely nods to their “fit for a queen” status!
Fun fact: Recipes for queen cakes 1800s style appear in historic cookbooks like Hannah Glasse’s The Art of Cookery (1747).
Can I skip the rosewater or currants?
Absolutely!
No rosewater? Use vanilla extract or orange blossom water for a floral hint.
Not a currant fan? Swap in raisins, chopped dried apricots, or even dark chocolate chips for a best queen cakes recipe twist.
Is brandy necessary for authenticity?
Historically yes, practically no: Brandy was common in 18th-century baking for preservation and flavor. But you can:
Omit it for a family-friendly version.
Substitute with orange juice or apple cider for a fruity undertone.
Can I make these gluten-free or vegan?
Gluten-free: Use a 1:1 gluten-free flour blend (add ¼ tsp xanthan gum if the blend doesn’t include it).
Vegan: Replace butter with coconut oil and use flax eggs (1 tbsp ground flax + 3 tbsp water per egg).
How do I prevent sinking currants?
Pro tip: Toss currants in 1 tsp flour before folding them into the batter—this keeps them evenly suspended!
How long do Queen’s Cakes stay fresh?
Room temperature: Store in an airtight container for up to 3 days.
Freeze: Wrap individually and freeze for 1 month. Refresh in a 300°F oven for 5 minutes.
Can I use modern baking tools?
Of course! While 18th-century bakers used hand whisks, feel free to use a stand mixer for creaming butter and sugar. Just don’t overmix—keep that tender crumb intact!
What’s the best way to serve them?
Classic: Warm with tea, as the queen cakes 1800s tradition dictates.
Decadent: Split them open and add a smear of lemon curd or clotted cream.
Still have questions? Drop them in the comments
Final Thoughts: Bringing History to Life in Your Kitchen
Baking the 18th-century Queens Cake recipe is more than just making dessert—it’s stepping into a piece of culinary history. These delightful cakes bridge the gap between tradition and modernity, offering timeless flavors that can fit seamlessly into today’s occasions.
Here’s why this recipe is worth revisiting:
- A Taste of Elegance: With their buttery crumb, warm spices, and bright citrus notes, these cakes bring sophistication without fuss.
- Versatility at Its Best: Whether you serve them plain for historical accuracy or with a modern twist like a citrus glaze, they’re a conversation starter.
- Perfect for Any Occasion: From tea parties and brunch spreads to holiday feasts, Queen’s Cakes shine in every setting.
Pro Tips for Success
- Prep Ahead: Bake these cakes a day in advance—the flavors develop beautifully overnight.
- Make It Your Own: Experiment with flavor swaps like lavender or cardamom to put a personal spin on this classic.
- Presentation Matters: Dress them up with a dusting of powdered sugar, or arrange them on a vintage plate for a historic touch.
These cakes aren’t just food—they’re an experience. Share them with loved ones, and let the story of this recipe add richness to the moment. Baking like it’s 1747 has never been more delicious—or rewarding!
[…] You May Also Like: 18th Century Queens Cake recipe […]
[…] Don’t Miss This Recipe: 18th Century Queens Cake recipe […]